Hand-Dyeds and A Finish

Remember these?

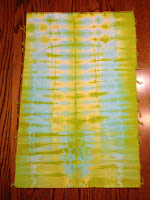
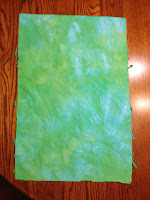
These were the fabrics created in my snow-dyeing experiments a couple of days ago.

Yesterday I had the day off and since dyeing is a fairly restful activity for a sick day (still coughing!), I decided to review Jane Dunnewold's

"The Art of Cloth Dyeing" class in Craftsy

that I'd purchased and watched some months ago. I'd bought the kit of supplies from Craftsy, figuring that it was simpler and just about as cost-effective to buy the kit Jane had put together with the basic supplies needed than it would be for me to chase all over the Internet finding and ordering them.

I felt a bit like a mad scientist in my basement, with rubber gloves and mask on, hunched over a table mixing chemicals. It was a hoot.

I started out well organized. Look how neat and clean everything is.

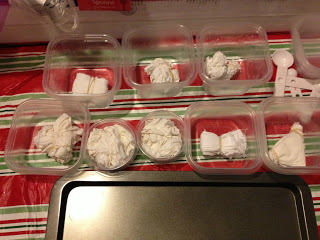
 And here are my fabrics, neatly wadded, scrunched, folded, banded, or bundled, waiting patiently....

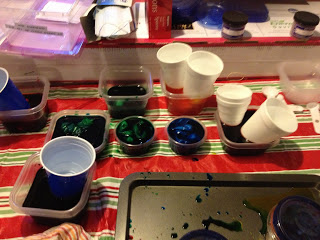
Soon enough there were drips and puddles and bins of things in wonderful, hopeful color baths.

(By the way, those screw-on lids on Rubbermaid "Twist n' Loc" containers? They seal tight about half the time. Ask me how I know.)

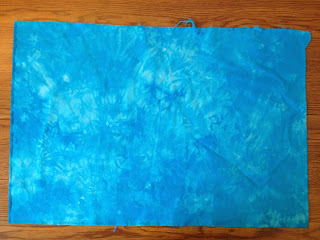
And lookie what happened.

This one was straight turquoise.

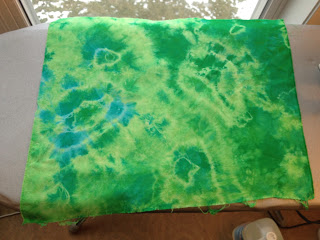
This is roughly the same mix of turquoise and yellow that I did with the snow-dyeing above.

The colors are so much more brilliant!

I was shooting for teal on this one, using less yellow proportionately to the turquoise, but I ended up with this wonderful abstract art instead. Love it.

(Scrunched and rubber-banded little "buns" of fabric in a few places.)

This is a white tone-on-tone that I had in my stash and sacrificed to the Cause of Experimentation. In this picture, the side showing is the white tone-on-tone side. The white print acts as a resist for the most part--it's only dyed the lightest green but mostly stayed white. I wasn't too fond of this side.

(Accordion fold, rubber-banded in a couple of places.)

But the reverse? Here's the wrong side of the above fabric. Very, very nice.

It was a fairly dense print on the fabric to start. It would have been more interesting if there were less of the print to resist and more of the background to get dyed.

This was in a mix that was more turquoise than yellow. I was hoping for a teal, but instead I got this really funky mottled effect. Love!

(Scrunched up with rubberbands holding little mini-buns here and there.)

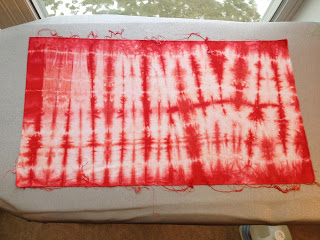
Yummy red. Straight-up red, not mixed with anything.

(Accordion fold with a couple of rubber bands.)

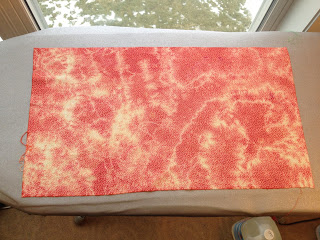
Another section of that white tone-on-tone. I was shooting for orange here. Almost got it. I have to play more with my color recipes.

Again, I wasn't as happy with this side as I was with...

...this side. Wowzer.

(This one was scrunched up tight and then I wrapped the ball with a couple of rubber bands to hold it as tightly closed as possible.)

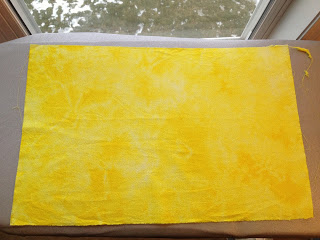
More of the white tone-on-tone, this time dyed with straight-up yellow. (I think this one was "Sun Yellow.")

The mottling comes out better in this picture than in real life. It mostly just looks like yellow fabric.

And the wrong side of the fabric. Although in this case, I'd use this as the right side.

Hmm. Looks pretty intense here. It's not that bright--just a nice, springy, lemon yellow.

And my favorite result of the day? Here we go, drum roll please.....

BAM!

Now THAT'S what I'm talking about.

I mixed turquoise and red for purple, folded the fabric in a triangle and used a couple of rubber bands on two of the ends.

I

Love

This.

Unfortunately, I've run out of dyeable fabric--at least, what I'm willing to sacrifice from my stash for the time being, so I've got some PFD (prepared for dye) fabric on order now from

Dharma Trading Company

. You don't have to have PFD, by the way. I'm just testing various things to see what I like best. Some of the above fabric was Kona PFD fabric I'd picked up at Joann's awhile back. Some was white/off-white quilter's cotton I'd gotten in the scrap box from Fat Quarter Shop, and some was the aforementioned tone-on-tone. I washed the scraps and tone-in-tone with Synthrapol to prep it for dyeing. It all took the dye beautifully.

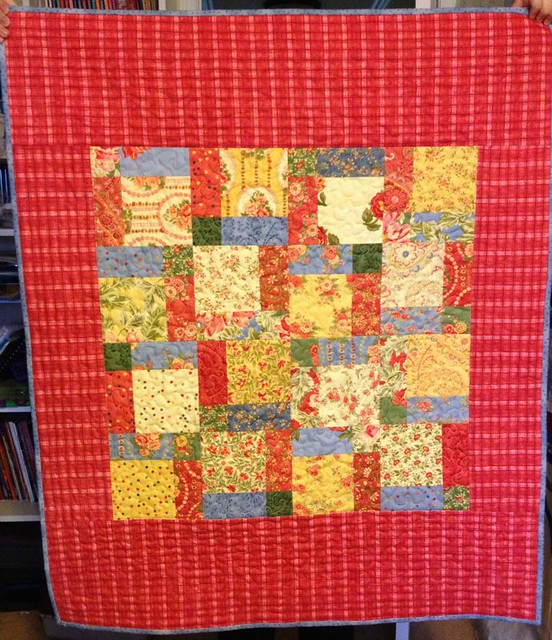
Oh, and that other thing...my second finish for 2013...

"Are You Getting Sleepy"

aka The Poppies Quilt

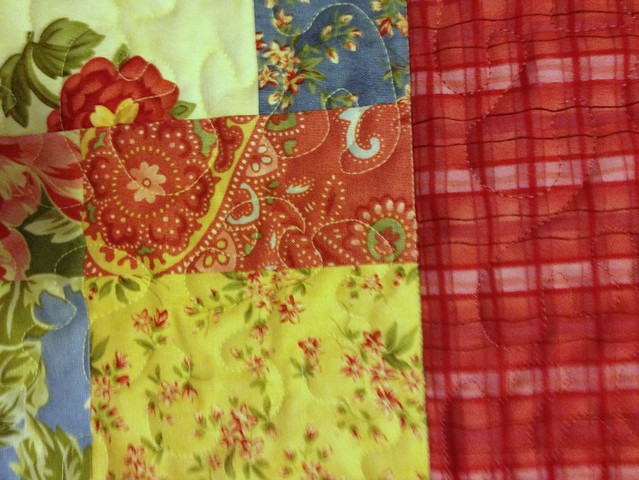
Detail of pantograph quilting by

Mt. Pleasant Quilting Company

It Is Finished... Easy Street Complete!

 
And so, it is complete.
The longarm quilter did a nice job with a pantograph flower. I asked her to do whatever she wanted, but to make it blend. She chose well!
I did a purple binding (also from my stash--yay). The backing was 108" I bought at the quilt shop when I dropped it off for quilting. The measurements worked out perfectly--I didn't have to cut or piece a dang thing for the back.      

Looking back through time from its humble beginnings as a stack of fabric...

No, I'm not a whole lot more thrilled with it now than I was before. However, my husband really likes it and it fits the bed in our son's bedroom (now mostly a guest room). And it's soft and cuddly now that it's been washed--nice and wrinkly like I like them. I'm not sure it'll ever grow on me, but that's okay. I don't feel the need to absolutely love everything I do. If I don't love it, or love the process, I at least have to have learned something, and that I did. So it's all good. 


Catching Up...WIPs, BOMs, and Finishes, O My

Boy, howdy, has it been awhile since I've written a blog post! My apologies. It's not for want of quilting to show, it's for want of time to write the posts about the quilting I've been doing. It's time to play catch-up, and the fastest way to do that is with a little photo-essay...

The Progress Down Easy Street (not in strict complete weekly order)


I have everything pieced--just have to put the top together. I'll be talking about this in an upcoming episode.

My Guild Paper Pieced Block of the Month
We're using Carol Doak's 300 Paper Pieced Blocks book. The BOM leader is choosing the block each month. I'm using only scraps from my scrap bin as much as possible--so far, with only two months under my belt, so good. We'll see what happens when I get into months 10-12! I'm trying to keep all the colors at the same intensity and saturation level, with scrappy white backgrounds, so no matter what the blocks are I'm hoping they'll all hold together at the end. But I'm also being flexible--if I can't get them all into one project I won't sweat it.

January's block


  February's block already done (woot! I'm ahead!)


My little growing village. 
@verylazydaisy said they looked like gnome houses; 
so now I think of this as Gnome Village. 
We'll see what the next block brings!


An Impulse Project: Christmas Tablerunner

I bought some Christmas fabric on sale that I really had no right to be buying given that (1) it was a couple of days before Christmas and (2) I already had a respectable stash of Christmas fabric at home that hasn't been used. So, to waylay the guilt factor, I immediately made a table runner out of it that weekend and successfully used up all the Christmas fabric I'd bought plus some white from my stash. So while I still have the aforementioned respectable stash of Christmas fabric, at least I didn't add to it! (My apologies--I stuck a black border on the picture and belatedly realized it makes it look like there's a black border on the tablerunner itself. There's no black border on the tablerunner.)

I also poked away at a quilt for a family member but it got set aside until I can finish Easy Street. That one really isn't picture-worthy yet--mostly a bunch of cut fabric at this point.

We have family in from out of town for the rest of this week/weekend so no more sewing for a little while. Things should settle down next week so I can get back into a blogging routine again!

Finish! Disappearing 9-Patch

Disappearing 9-Patch WheelchairI completed the Disappearing 9-Patch I pieced during the Black Friday Sew-In. I've posted pics of this in progress so the finish isn't quite as exciting a reveal as usual, but there it is. They always look that much more interesting when they're completed!

For those of you jumping into the middle of the story, I'd been wanting to make a Disappearing 9-Patch for awhile so I decided a bit on a whim to grab a charm pack I'd had in my stash for a year or more--Moda's "Portugal" line--and just went to town without worrying about how big it would end up. The center came out to something like 26"x26". Since I wanted to make it for a person in a wheelchair, I looked up what other people had found to be a successful size, and the suggested size was a rectangle. Since I wanted this done quickly, I opted for the simplest solution, which was putting honkin' big borders top and bottom with more reasonably sized borders on the sides. I wasn't sure about it at first but it's grown on me. (I put all the measurements in my original post on this linked above. Frankly, I don't even really remember them now! Too many other quilty projects in between.)

Dis9P detailEverything was out of my stash. I got to use not only the charm pack, but about a yard for borders, a couple of yards for a backing (yellow--not pieced), and gee, maybe a quarter yard of the blue for the binding. Probably less.

I did a simple meander with yellow thread in the center and a pretty dark red shinier thread in the borders, so it blends but still gives it a little spark with the shine. (Sorry the picture's blurry--the lighting was bad.)

It turned into quite the happy little quilt. Originally it was going to be a donation quilt but then I realized after I had the top pieced that I didn't have a gift yet for a family friend that I always do something for at Christmas, and since she's in a wheelchair, this was perfect. So it got repurposed for her, and I know she'll love it.

I'll be making more of these in the future as donation quilts, I know--although next time I'll use two charm packs so they'll take up more space!

I got Easy Street Week 3 done, technically, before Week 4 was posted, although I'm still trimming up some dog-ears. I've started the cutting on Week 4. It's going relatively quickly since I had a lot of 2" strips of the required fabrics left from previous weeks. I don't have much doubt I'll have them done by Friday, although we're decorating our tree tomorrow night so I won't get back to my machine until Tuesday. I didn't do the linky on Bonnie's blog last week; may not get to it this week. I'm still playing along, though! (I'll post pics of 3 and 4 together later this week.)

Postcards a-Plenty!

And so the great reveal! Although if you follow Sandi's blog, you've already seen the reveal since she got her post done last night and I'm the Sandy-Come-Lately in this pairing!

Here's the postcard I got from Sandi. Isn't that fussy-cut ornament just adorable? I love how it also includes the little loops on the top of each ornament. She did really nice decorative stitching on them as well with variegated thread. It's just adorable! It's got a place of honor on my mantle this year and will become a decoration that's put up every Christmas. Sandi and I have decided to make our postcard exchange an annual tradition!

Here's the one I sent Sandi.

Someone asked me to describe how I did this. I (oops) neglected to (dang) take photos during the process (shoot). I'll do my best to give a verbal description here. I had a ball doing it, although I made some parts a little complicated for myself. Live and learn. Also, I did this during a sew day with my guild so I was away from all my usual supplies. I'd grabbed some that I thought I might use before I left, but had to improvise a bit here and there.

I had the basic image in my head of a crazy-quilt-esque background and a close-up, off-center pointsettia. From there, however, it was design-as-you-go. I decided to take the log-cabin-style approach to the crazy quilt piece.

  • I had with me a lot of green scraps from my scrap bin plus a couple of holiday fat quarters. I cut a bunch of strips that ranged from about 1 to 2" wide. They were mostly longer than 4" but not entirely--you can see where some of the shorter ones were used in the lower right. 
  • I used a piece of muslin as a background, and cut it slightly larger than 4x6", giving myself a little wiggle room in case things shrunk up on me with all the seams I knew I was going to have.
  • After a false start with the sewing first piece (see below), I realized that I really needed to stabilize the muslin before proceeding. I've decided beginning an experimental project with some seam-ripping is a sign of good luck. My story, going with it.
  • I happened to have some of the Ricky Tims Stable-Stuff Poly with me, which is great but isn't fusible. I had a very lightweight fusible of some sort so I cut the stabilizer to the same size as the muslin, then fused the muslin to the stabilizer. So much for needing room for shrinkage now, since the stabilizer would take care of that. Still, I like me some wiggle room.
  • I started with a yellow-green scrap that I cut into a random pentagon shape and then used just a dab of glue to help hold it on the stabilizer. (See the yellow-green peeking out from behind the flower? That was the starter patch.) Then I took my first green strip, lined it up right sides together along one edge of the yellow-green pentagon, and stitched. I pressed it open and then took my next strip and sewed it to the next edge, and so forth, moving around the sides of the pentagon in succession. I only trimmed anything that was hanging way over--for the most part, you're sewing over any extra bits and since this was all going onto a stiff background and nothing I was going to be trying to hand-quilt through, I didn't have to worry about close trims.
  • Since it's a rectangle, you eventually can no longer go in even rounds and have to just start filling in space with strips. I just had to think through a little bit to make sure the strips would cover the entire space I needed to cover and not leave me with a random blank spot in an awkward location. This is where I did find it helpful to have much longer strips that I'd then trim back to fit better after I sewed.
  • Once the background was complete, my friend pulled up a picture of a pointsettia on her cell phone and I looked at it for some direction--that's when I realized it had several layers of petals, some lighter than others. I had a couple of red fat quarters with me but needed something lighter. Fortunately, my sew-buddies were generous with their scraps! (I traded some back with them too--great way to get new-to-you-fabric!) I just free-handed the cutting of the petals, then used a dab of glue baste to hold them down until I could do the machine blanket stitch around the edge of each petal. Originally I was going to do french knots in yellow for the stamen in the center, but I wasn't sure how much would actually show once I put the binding on (see below) so I bagged that idea.
  • I played with a variety of decorative stitches on my machine along most of the seams. Hadn't used most of those stitches before. Some worked better than others, but hopefully Sandi didn't look too closely. :-)
  • Once it was done, I fused it all to a piece of Peltex double-sided fusible, then cut my backing fabric and fused that on, and then trimmed it all to a true 4x6" size.
  • Because of all the pieces on the crazy-quilt front, and because I now had several layers fused together with the stabilizer still in there (didn't want to risk ripping it off when all those seams were involved--and it doesn't have to be removed) I had to put a binding on it. I didn't think a decorative stitch would really work in that instance, and it would've been a real pill if I'd tried it. So I put a narrow binding on completely by machine, with a certain measure of success. That's something else I need a little more practice on. 
Sandi and I had agreed ahead of time that we'd send each other pictures of what our postcards looked like when they arrived in our respective homes so we could test out whether the postal system would damage them. No damage at all! Now, if we were to have used embellishments of any kind, using an envelope would definitely be safer. But I'm pleased to report that our experiment worked beautifully, we've started a new, wonderful holiday tradition, and we both had a blast.

So, my friends, start making postcards! They're a hoot!

A Finish--Just Playin'


 A few weeks ago, I decided to play with a technique I'd been wanting to mess with for awhile. So I gathered up a bunch of snippets of embellishment threads, yarns, and cords.

This...


Became this... 


 (This a little more close up...)

And soon became this after I soaked off the water soluble stabilizer.

And then it sat for awhile.

Last night I dug into my fat quarter stash and turned it into this:


Which is dimensional, by the way. My current modus operandi.
 Each layer was done by itself, quilted, and then attached the layer beneath or above. 

 (Can you see I free-handed some feathers to frame the thread? First time for that too!)

Ahem. Currently no idea what I'll now do with this. It doesn't have an obvious way to hang it (no binding to sew a sleeve into), so I need to do some more thinkin'. And playin'. But even if it never hangs anywhere, it served it's purpose. I experimented, tried a few techniques at once that I've been wanting to try, and I had a ball playing. What have you experimented with lately? Fabric-wise, that is.

#BFSI In Review

Friday was, yes, our Black Friday Sew-In! Woot! And a great time was had by all. The giveaway on my blog was great fun--loved reading everyone's responses! Congratulations to Brenda J (The Quilt Show subscription) and  Fiber of All Sorts (The Fat Quarter Shop certificate), the lucky winners of my blog giveaway!

Thanks to all the other bloggers who hosted their own giveaways and linked up here. It made the party even bigger!

And even more--I did four mini-giveaway challenges via Twitter through the day. Posted those winners via Twitter. Again, I loved reading everyone's responses to my questions!

What else did I get done on Black Friday, besides hang out on Twitter? (By the way, for me "BFSI lasted through Sunday morning--other than some Christmas decorating and going to a movie with the fam, I basically hung out in my sewing room most of the weekend--so this is a tally of everything done from Friday morning until this writing.)


I took an April Cornell charm pack (Portugal) I've owned for several years...
 ....made some 9-patch blocks out of it....

...and then turned it into this Disappearing 9-Patch.

The astoundingly oversized borders are because I'm making this a wheelchair quilt to donate to a local nursing facility and the one charm pack only makes a 26"x26" square center. Wheelchair quilts should be in the neighborhood of 36"x45" so I added 5" borders (finished) to either side and 9" borders (finished) to the top and bottom. Normally not a design choice I'd make but I think it works okay. I didn't have another charm pack that coordinated and I also didn't want to cut just a few squares from yardage in my stash, so I went with the honking-big-border technique. And hey, I got to use another yard out of my stash for the borders, 2 1/2 yards for backing and another part of a yard for binding. Big stash-busting happening this past weekend!

Disappearing 9-patches are fun. I'm already digging into the rest of my charm pack collection to see what ones I might work with next--they make very fast donation quilts! This only took about 90 minutes total to get to this stage. Since I'm just going to meander-quilt it, it won't take any time at all to finish completely.

Then, rather on a whim, I pulled another set of fabric off my shelf that's been there for a few years. I fell in love with a vendor's booth the last time I was in Houston in 2008. She did all her own hand-dyed fabrics with various surface treatments--super cool stuff. I bought a roughly one yard piece of fabric and then several small pieces that each had leaves stamped onto them. No idea what I was going to do with them, which is why they sat.

Finally today I just bit the bullet, did some arranging, lightly fused them into place as a basting method, pulled some yarn apart to make it a little thinner, then did some stitching and embellishing. I also loved the frayed edge of the background fabric so I frayed all the pieces to give it all a very organic, rough-hewn look.

It's not really a quilt since there's no batting, backing, or quilting. Let's call it a tapestry.


Leaf details 1


 Leaf details 2


I can't put a hanging sleeve on it because stitching would show through front so I need to find a hanging device with hooks that fits the mood of the piece.


And then I finished something I'd been playing with for a bit.

Karen Lee Carter teaches a dimensional flower technique that I've been wanting to try. Since this was a test piece I used some scrap fabric for it, so my fussy-cut flower (center) has a part of another flower overlapping the leaf. That particular fabric doesn't have any whole flowers untouched so it doesn't work well for fussy-cutting. Again, test piece, didn't worry too much. I did some satin-stitching for the first time--need to practice more on that. Then I also used it to test another technique I saw in Quilting Arts Magazine: cut a hole in the center of something and sew across it to create a web effect. Very cool!


Detail of dimensional flower


Detail of webby hole in the middle.

Love both techniques!

I also put together a few new "quilt sandwiches" to practice my FMQ on, and the rest of the time I spent poking away at Easy Street Week 1. I'll put pictures in the Flickr and Threadbias groups tomorrow (Monday) and be linking up to Bonnie's blog then. 

I had a very productive long weekend. What about you?

Another finish (and it took long enough!)


It took stinking long enough but I finally have my pieces of my team's donation basket for a silent auction to raise funds for a local hospice house. My team's theme was "spa," and I volunteered to make candle mats and a lavender sachet, using lavender harvested from my garden last summer.

I didn't want to mess with making a circle something-or-other, so I chose three blocks that had sort of round feels to them and made them 6 1/2" (after getting a pillar candle from my own meager candle collection to see about what size would work best). @ddrquilter suggested quilting it in circles--a great idea!--which gave me a chance to play with the circular sewing attachment for my Janome. The attachment mostly worked--I'll probably talk about that on a future podcast episode.

Then I got to the binding. The poor block in the center got bound three different times, using two different methods, none of which worked. Rip rip rip. And rip some more. And run out of the original binding fabric, which was the rest of that wonderful pink that appears in two of the blocks. Finally, after several hours of nonsense spread over two nights, I had a "doh" moment. Use a method I hadn't used in years. Once I did, and once I found another fat quarter that coordinated, bang. All three bindings done in about half an hour. Jiminy Crickets, but I can be my own worst enemy.

And here they are, all ready to go with the pillar candles I bought to go with them. My basket offering...done!

We'll be putting together all five baskets at tomorrow night's guild meeting. The other themes were "tailgating/picnic," "baby shower," "holiday," and "kitchen." Pictures will be on our guild's blog at http://canalcq.wordpress.com within a few days, probably. I can't wait to see what everyone else has come up with!

(Sorry, my plan had been to get a Total Color Tuesday post done tonight to appear tomorrow but I spent all night working on the donation blocks instead. Dang, but I'm glad those things are done! It's always the simple projects that trip you up, right?)

Finally--a Finish!

I finally finished my project from the Craftsy class "Stitch and Slash," taught by Carol Ann Waugh. Woot! Had a grand ol' time with this; it's a very fun and pretty easy technique. I'll be podcasting this week about the class with my special guest, AJ of The Quilting Pot, as we talk about our experiences taking this class. I'll post more detail, including "in process" pictures, tomorrow when I've got a little more time. Just had to celebrate having my first finish in awhile!

(Front)

(Back)

(And yes, currently unnamed. Any suggestions?)

Randomness and a Finish

1. My friend Lori from guild took my left-over baby receiving blanket flannel scraps and turned them into adorable stuffed bunnies. Bunny is now a spring decoration in my home. He makes me smile.

2. I need a pedicure. Not at all related to #1.

3. It's officially summer by my clock. I got in the pool for the first time today. Hence noticing #2.


 4. Stonyfield Organic Low-Fat Vanilla Yogurt, frozen pineapple chunks, frozen mango chunks, a fresh banana, and a splash of orange juice make for a wonderful, vacation-y-feeling breakfast smoothie. A little beach time without the beach. Or the time. But we'll take what we can get. Puts me in the mood for #3 and, by extension, #2. Maybe I'll bring #1 with me to cuddle too.

5. I finally finished "Joy"! It started out just playing with shapes, but that word kept coming to me and became the guiding principle.


5a. It's the joy that I've witnessed in the lives of so many women. Women who have been through Some Stuff. And yet, joy abounds.


5b. I learned how to let go.

5c. I discovered the fun of just cutting shapes and seeing what happens.

5d. I learned to be okay with the fact that a fern suddenly looked a whole lot more like a big speckled bird. Conversation piece.

5e. I listened when my quilt told me it needed another fern peeking out from the side, behind the border. "Okay. Whatever you say. You're the boss."

5f. I took my time, redoing a figure several times over until I got one that was more or less the shape I was going for. I found fascination in noticing the slight changes in line that could create a whole different sense of movement.

5g. I had fun using some great fat quarters I've had kicking around for awhile and never quite knew how to use.

5h. Some pieces are just too dang small. Even for fusible, raw-edge applique. I'll cuff myself upside the head next time I start doing little bitty feet or arms. (Note the woman bending over in the back of the top picture. Her appendages gave me fits.)

5h. I learned when to say "enough is enough," let a project call itself done, and get ready to move onto the next in the series.

Chicken Butt Finished!


Chicken Butt Finished!
Originally uploaded by sandyquiltz
Just a short blog post to announce a UFO finish... woot woot! You may remember this guy from my stash mystery challenge (this post, and this one, and finally, this one). Chicken Butt is finally completely done!

I didn't do a whole lot of quilting on him--just one fairly close outline, then one a little further out, then a funky wide meander for the rest. That's partly because the quilting wasn't the point on this one, but also because he had a little puckering from the threadpainting and I needed to give the fabric room to breathe--the puckering did pretty much quilt out, yay.

The white stars (or snowflakes, however you want to interpret them) were a very belated decision, after I already had the backing and binding done. So you can see the back of the embroidery on the back of the wallhanging--normally you'd do that first and cover it up with the backing. But, oh well, it's not like I'd ever hang this guy backside out on the wall. After all, he's already backside out. What would be the point?

He still makes me smile.

BDSI Completed Projects...and A Rant

As anyone who participated with us on Twitter for our Boxing Day Sew-In (#BDSI) may recall, I was sick as a freaking dog that day. I came down with a tremendous cold the Sunday before Christmas (the 18th), and still have it today. Yikes. So I wasn't doing a whole lot of sewing on Sew-In day, but I sure as heck had fun with the conversations and reading everyone's comments on the BDSI blog. It was a hoot! I'll definitely be hosting either another Anti-Black Friday Sew-In or Boxing Day Sew-In again--had too much fun not to!

So, who cares that it actually took me three days to finish my BDSI projects? They're done!

I had several donation projects to work on. These were all pieced tops and/or orphan blocks that had been donated to our guild over the years for our guild to use for it's own donation projects. How long had they been in storage? Let me just say that one of the tops still had pins in it, and the pins were rusted to the fabric. I had to do some extrication. And some praying that my tetanus shot was still current.

Lockjaw aside, I got them done. First up: two pieced tops that were roughly baby quilt size. Like, newborn-baby-just-home-from-the-hospital size. Most babies won't be small enough to use this quilt for long. But that's OK, because by then, they'd be able to see, and who would want to see these?

But let me rant later.

In short, I'll simply say for now that rather than creating two ugly quilts, I decided to contain the damage and only make one with two ugly sides. Used some strips for binding and batting from my stash, so that all worked out nicely.

The other project was the poor little orphan block. Really, she was almost there. Almost cute. But she had some issues, which is how she ended up being a donated orphan block.

I suspect many of the issues really came from the fabric that was used. The white is an extremely loose weave and fairly coarse--it didn't want to play nice with the blue print (which was a much higher quality fabric).

I puzzled, and puzzled, 'till my puzzler was sore. Turn her into a baby quilt? Nope--I had absolutely nothing in my stash that would work with that particular blue. Turn her into a pillowcase? I put the white fabric to my cheek. Ick. Nope. Finally it dawned on me.


A drawstring bag! Lots of places look for drawstring bags--for example, hospice homes like to send personal belongings home for family members in something nicer than a plastic grocery bag.

She works nicely for that, although I have some concern about how durable the white fabric is. Probably not a bag for carrying sharp, pointy things. Or rocks.


I solved the non-coordinating fabric thing by going patriotic and using a red fat quarter with stars from my stash. Wouldn't be my first choice if I was in a quilt shop, but hey, it works.


So, now can I rant?

First disclaimer: I've seen a lot of very lovely donation quilts on blogs and in person. I'm not talking to anyone here, nor am I pointing any specific fingers at anyone other than myself. But I'm also aware of--and inadavertantly became involved with--another side to the donation quilt story. I hope I don't offend anyone with this, but the last several donation projects I've been involved with have really worked my very last nerve, and in the process, I came to some realizations about how they had even begun to affect my own attitudes. To whit:

When did we ever get the idea that we can use our ugliest fabric in the most haphazard way or our blocks that clearly didn't work at all and donate them? It's like donating shirts with tears and stains or electronics that don't work or furniture with broken legs and assuming, "Hey, I don't want this piece of junk in my house anymore but someone else will be grateful for it." Yeah, maybe (although I have my serious doubts), but we're talking quilts here. We talk about quilts symbolizing love and care...so what the heck?

Doesn't everyone deserve beauty in their lives? Especially some of these places we're making donations too--women's shelter's where mothers and children are struggling to put themselves back together; hospitals with families watching loved ones in pain; families who have been burned out of their homes. Why wouldn't I want to give someone in need just as pretty a quilt as I'd give my own child? Sure, maybe I won't do heirloom quality hand-quilting on it, but I sure as heck would want to choose fabrics that will bring pleasure or a bright spot to what may be an otherwise gloomy day. I sure as heck would want to show some care in my design and in my piecing. I would want the person to think I actually thought about them--even if in the abstract, a nameless person that I've never met but I can have some genuine human empathy for. Not just a way to offload ugly fabric. (And although I know one woman's ugly can sometimes be another woman's beauty, I've read enough tips on enough message boards that have quite literally said, "use that ugly fabric in a charity quilt!" to make me steam.)

I also came to the very discomfiting realization that my own attitude changed whenever I worked with those unattractive, often musty-smelling tops. I stopped caring about my own skills. I adopted a very "I don't care, just get 'er done" attitude. Fast and Finished was queen, not Done Right. Which, of course, led to me simply compounding the problem of ugly quilts with shoddy workmanship. And that's to my shame. I'm doing some penance over that one.

People don't necessarily need blankets...they can buy blankets pretty dang cheaply at big-box stores these days. Frankly, if my purpose is to provide a blanket, I'd rather write a check. The reason to make a donation quilt is to go that step beyond, provide someone in need with just a little bit more: the thought that someone else cared enough about them in their situation to sit down and make something by hand. But for pity's sake, please make it pretty.

I vow never to make an ugly quilt for donation again. I vow to never be attached to making ugly quilts for donations again. I will choose to make my own donation projects from my own beautiful fabrics with an attractive design, not some slapdash thing that "someone ought to be grateful for." I will choose to make something that shows someone I cared enough to take the time to think about it, even if it is a simpler pattern, even if it is a slightly faster style...it's still attractive, and thoughtful. And hopefully, will give them a touch of love and care at a time when they need it most.

If I wouldn't want it in my own house, I won't donate it to someone else.

Ok, rant done. Sorry--had to get that off my chest. Hope I didn't bug anyone. To purge myself of these negative feelings and bring some Beauty Mojo back to my sewing room, I plan on making a donation quilt from my own fabric before my vacation is done. I'll keep you posted.

Winner of Blog Hop, Next Big Event, and Some Pics

First, thanks all for coming to the party, the Quilting Gallery 4th Birthday Party blog hop! I had fun reading everyone's comments and can pretty much guarantee you that it'll end up as a podcast episode coming up soon. I'm also so thrilled to announce that, with thanks to the random number generator at random.org, SassyCoconut won the drawing! Woohoo! I've picked up from reading SassyCoconut's blog that she's a young, new quilter. I'm thrilled to have the opportunity to help her along in her quiltmaking journey just a little bit more. Congrats, SC, and thanks again to everyone else!

Now, the next big event... #ABFSI (Anti-Black Friday Sew-In) was so popular--and so many people wanted to be sure we did it again next year, that I decided, why wait? Several other podcasters and bloggers have decided to join in the fun with me this time and we're hosting the Boxing Day Sew-In (#BDSI) on December 26th. Pam ("Hip to Be a Square" podcast), Sandi ("Quilt Cabana Corner" podcast and pattern designer), Jaye (www.artquiltmaker.com), and Tanesha ("Crafty Garden Mom" podcast) are all joining me in offering up great give-aways and fun ideas for the day, so plans are in the works. Eschew the crowds at the shopping centers (isn't "eschew" just a great word?) and stay at home in your jammies and sew! We'll have lots of giveaways and a variety of ways to win, so mark the date on your calendar and watch here for more details as we figure them out. We'll find a way for you to participate whether you're on Twitter, Facebook, or none of the above...so for now, just make your plans to stay home, pick out your fave pair of jammies, and get ready for a relaxing day of fun and quiltmaking!

Meanwhile, back at the ranch.... During the blog hop week, I managed to get some stuff done. Here's a picture of my son's Christmas gift...he's a student at University of Buffalo. I downloaded their logo, created it in applique, then echo-quilted around it (not worrying, obviously, about being too exact on those echoes!).

It finished around 13" x 15" or thereabouts--not very big. But I think he'll enjoy it.
Second finish of the week, my niece's quilt I'm naming "[her name]'s California Dreams." She loves visiting her cousins in California, and the fabric line is named Sausalito, hence the name.

Not that she'll ever know, since I didn't make a label. I'm not expecting any of these quilts to last until I'm no longer on this earth and will be making them much nicer quilts sometime in their future, so I wasn't sweating the labeling thing this time. I'm documenting it on my end, though.

In any case, this was the Five Yard Designs pattern--one yard each of five fabrics does the entire front, border, and binding. It requires a couple of additional yards for the backing.


I had it done by my wonderful long-armer with an allover pantograph--couldn't get too good a picture of it because of stinky lighting. Apologies.

I still have one more quilt to get bound before Christmas, so watch for more pictures by the end of the week.

And don't forget to mark the 26th on your calendar!

ABFSI Report--Anti-Black-Friday Sew-In

Got all my hexies cut...finally... (218 in total.)

Got my Christmas table runner done. 

(Well, technically, that project stretched into Saturday and Sunday but it all blurred together so I'm counting it as ABFSI.) This was the one that I started at my quilt retreat--just had to do the backing, quilt and bind it. This was a "Triangle Tablerunner" kit from Generations Quilt Shop in Pottstown, PA. It's almost 50" long, about 13" wide. I even remembered to put a little label in the corner--which will be handwritten with a sharpie where right now you can barely see my pencil markings. Nothing fancy there. The backing is something I inherited from my Mom--she'd have appreciated this particular use. Stitched in the ditch, no quilting on the border. Very, very basic. This is going to be a gift for a home with little tots so I wanted something sturdy and that wouldn't be fancy enough that it would break anyone's heart if something happens to it. A Very Practical Christmas. But aren't those pudgy birds with Santa hats just the cutest dang thing?

I was supposed to go somewhere Sunday afternoon and it got cancelled, so I made very good headway on my pinwheel wallhanging, too. It was a banner weekend for quiltmaking up in these parts!

UFO Finish! The "Cautionary Tale Quilt"

Yippee! It's finally done!

Actually, it's been done for a couple of weeks. I just finally have the time to sit down and blog about it. Doing lots of catch-up this week!

This is the "cautionary tale" quilt I talked about in episode 56 of my podcast, "Quilting...for the Rest of Us." (A lot of listeners shared their own cautionary tale quilt stories in episode 59 as well. Entertaining--be sure to check it out. And it's never too late to leave comments with your own cautionary tales!)

Due to the wonders of photo-editing you can't really see how completely out-of-square it is, although if you look closely you can figure it out. Do me a favor: Don't look closely.

Still, I love the fabric and the colors, and my niece will presumably love it as well. This is based--with the greatest apologies to--a Fons and Porter episode in which they did the "Flip-a-Coin" design. The issues are not with the design; the issues are completely the quiltmaker's. I'd put a link to it but you have to be a F&P member to see it anyway so, if you're a member, just search for "Flip-a-Coin" on their website.
Here's a close-up of the quilting detail. The quilting was done by Andrea Nardi of Olde Glory Quilting. She doesn't have a website, but if you live more or less in my area email me and I'll send you her contact info. She does pantograph (all-over) designs--no custom--but has a great eye for what patterns will enhance a quilt. Love her work!

Off to take advantage of an unscheduled afternoon and make more progress on other projects. Now that I'm done traveling for awhile, my blogging will resume it's usual much-more-regular schedule. I've missed y'all--glad to be back!

Another finish--Serengeti

"Serengeti," designed by Toni Whitney (see post for info)
Yippee! I can add another finish to my list! I had a day off Friday after my trip to Phoenix and was so jet-lagged that I wasn't up to much except sewing. Or, at least, I had the right kind of sewing I could do while jet-lagged. Perhaps that's more accurate. In any case, between Friday, Saturday, and about an hour on the binding today, I was able to finish the Serengeti project in time for it to head off to college with my daughter. A week early, even! Woohoo!

To give you some perspective, this finishes about 26"x 24". I highly recommend Toni Whitney designs, and the kits for them through Bigfork Bay Cotton Company. The pattern was extremely well written and included all the drawings for the pieces in such a way that it was very easy to figure out which pieces were supposed to be done in which fabric, and in what order to fuse them down. As I have said before, I went ahead and bought the kit instead of just the pattern--it saved a tremendous amount of time trying to find the right fabrics, and I'm really not sure it was much more expensive than having done it all on my own would have been. Since this was to be a piece for my daughter's enjoyment and nothing that I intended as a piece that would show off my own talent, such as it is, I was fine with doing this one by kit. Usually picking out fabrics is my favorite part of a project, but this particular project would have made me crazy. I know my limits.

This pic shows a little of the detail of my stitching around the edge of each piece. The pieces are all fused down and it's not the kind of thing you'd do much quilting on (unless you wanted to really go to town with bringing out detail of fur with thread, I suppose), so you stitch down every one of those tiny little pieces to make sure they'll really stay put.

Then you put the backing on and quilt the borders. I just did a very simple stitch-in-the-ditch on the two narrow inner borders, and as simple as I could get in the outer border. Partly, I wanted to get the thing done so I didn't want to spend a lot of time on the borders, and partly I really wanted the focus to stay on the very cool and majestic lion.

I enjoyed doing this, and learned some things along the way. That being said, I'm also thrilled it's done. It'll be awhile before I tackle something that requires tweezers to move itty bitty pieces into place again.

Another project completed--yippee!

My MIL's quilt is done! Just as a reminder, it's a pattern named "Floral Bouquet" from the book Jelly Roll Quilts by Pam and Nicky Lintott. (This time DH is playing quilt hanger. He didn't complain as much as my usual DD quilt hanger does!)

It wasn't a hard pattern to put together, although I discovered this time how very stretchy jelly roll strips can be. You don't expect it because they're not on the bias, but they're on the width-wise grain which can be a bit bouncy. I had a little more problem keeping my blocks square with this pattern than I expected, but at the same time it was a very forgiving pattern because it had all that nice white space to give me room for squaring things up every step along the way.


Here's a close-up of one of the blocks. I tried to stay as random as possible without repeating a fabric in a block. I then mostly stayed random with placing the blocks in rows but I did switch out one or two that had too much repetition right next to each other.


Here's my label. (Yes, although I said in my podcast episode today I was considering not doing one, that was mostly due to time. But I ended up with time I didn't expect to have. It looks out of line because I blurred out part of it in the photo.) This is the first time I've made a label using the embroidery stitches on my sewing machine. It's not an embroidery machine so I don't have a ton of options, but it does have lettering. I had to practice on several scraps because I couldn't quite figure out how the embroidery would line itself up but finally got it. I drew some guide lines to keep each line relatively straight and each line evenly spaced from the other. The label doesn't have as much information on it as I usually do but it's never going in a show and I'm documenting all the additional information in my own records.


I left the lighting unbalanced in this one so you could see the quilting better (I hope). It was done by Andrea of Olde Glory Quilting. She doesn't have a website or I'd link it--sorry! She's a local long-arm quilter that only does pantograph--all over--quilting, but does a really nice job and was amazingly fast! I had it in a week. All I had told her was that I wanted something that would pick up on the floral but would stay "open and airy." She showed me this pattern and I knew she was right. It was perfect.

So that's it! My MIL will love it, I know. I also know I probably should have ripped the binding out and redone it because it really didn't work the way I wanted it to, but in the "real world," it's fine. And it's done, and now I can move on to the next project!

A wonderfully quick gift--sachets


Lavender Sachet
Originally uploaded by sandyquiltz
I whipped up this sachet tonight adapting a tutorial from Quilting in the Rain blog at quiltingintherain.blogspot.com. Her tutorial has a different design which I really, really like and will do at some point--it just didn't fit the particular scraps I wanted to use tonight. These are scraps from my MIL's quilt so guess who's getting the sachet?

My LQS had bags of dried lavender there when I stopped by last week. Couldn't resist picking up a baggie. Now I want to go buy more and use up a lot more scraps. I just started growing lavender myself last summer. We'll see if I get enough expansion this summer to be able to dry some myself.

The corners aren't pointy because I decided to reinforce the corners a bit by sewing a short seam diagonally across the corner seam. I had a sachet years ago (it was either a gift or I'd picked it up at a gift shop at one point--don't recall how it came to me now) that popped a seam in a corner and I ended up with little whatever-they-weres all over my drawer. So now I'm a bit nervy about those things. I decided I'd give up a bit of corner perfection for a bit of reassurance.

Anyway, cute project. Fun project. Fast project. Check out her blog!