

As I said in a previous post, I got this puppy done over Fourth of July weekend: The Catch-All Caddy by Annie Unrein. I'd started it the weekend before but I tend to go pretty slowly on Annie projects, double-checking everything before I do it (especially cutting). And I decided to get a little unusually persnickety for me and ripped out a few seams to redo them better. I'm not using the term "perfectionist" there because it's still far from perfect. But it did get a little better the second (and, ahem, third) time around.

Other end--open pocket
This is one of the two projects in Annie's Craftsy Class, "Sew Sturdy: Home Organizers." I didn't buy that class since the other project doesn't interest me. I decided I'd done two projects with her at my side in the Sew Sturdy: Travel Organizers class so maybe I was ready to go it alone. I bought the pattern and the finishing kit from her website and used fabric from my stash that I was thrilled to finally be able to use. (These three fabrics have been around awhile. The blue one is particularly aged as I inherited that one from my Mom's stash, and God only knows how long she'd had it.)

Caddy back (not to be confused with "Caddyshack")--the back panel has three pockets on it, whereas the front panel has two.
Turns out, perhaps, just maybe, I should've bought the class. Most of it went swimmingly, but I discovered (with #Twilter and fellow podcaster Pam's help) at the very end that I'd misunderstood Annie's description of an early step. So my inner dividers have raw edges at the bottom rather than nicely finished ones. By the time I discovered it I'd have had to dismantle most of it just to redo those bottom edges that no one would ever see. So I hit them with a ton of Fray Check and moved on. (It didn't help that every time I read "divider" my brain was thinking "pocket" so I kept expecting the bottoms to be sewn down to the side panels in some future step...a step that never came because they're bottomless DIVIDERS. How many times can I read that word before it sinks in??)
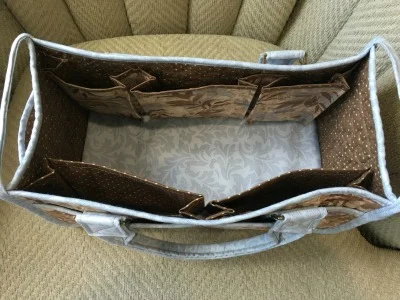
Interior--with a foam board inserted into a sleeve at the bottom to make it sturdy. Very nice touch.
Other than that one misstep, everything went really well until the binding. It's always the binding. It went somewhat better this time because I tried a couple of new tricks with it. A friend in my guild (Jan of Quilting Revolution) is taking a monthly class at an LQS that's all Annie projects. One of the teachers, when questioned about her beautiful, perfect bindings, said, "I use glue. Lots of glue." She said she glued the first side down, sewed it, then glued the second side down before sewing that. So I decided to try it.

Alien creature just landed from outer space, or sewing project? You be the judge.
I've decided I'm not keen on the glue trick. Or I need a different glue. Or I need to only use glue on one side but not both. The glue I used (Aleene's Fabric Fusion) gummed up my needle something wicked--I went through three needles on this project, two of them on the binding alone. It came out all gloppy, it was all over my fingers, it stuck to the clips...yuck. I had also used a slightly wider binding this time (2 1/2" as opposed to the usual 2 1/4"--which she does suggest you can try). I'm thinking the wider binding on its own probably would've been fine, no glue necessary. Either way, this binding did go better than my past Annie projects, but I still have a ways to go before it's really presentable.

Put to good use. And yes, there's a reason why the school book and "Coloring for Tranquility" are side by side.
All in all, though, I'm very pleased with this project. Ain't perfect, but I'm very okay with that. It's serving exactly the purpose it needs to serve and, to be honest, I am pondering the possibility of making myself a second one for my office. (I have more than one school book and packs of post-its and highlighters, after all.)
A couple of tips if you do an Annie project:
- Read through all the instructions a couple of times before starting anything. Make notes to yourself as you do so. For this one, I studied her cutting diagrams and numbered for myself the order in which I'd make the cuts just to make sure I had enough fabric.
- Buy Clover Clips. I have the smaller size in red and the larger size in green. I use the red ones all the time. For this project, the green ones came in handy a few times. There's another brand that has clips in other sizes too but I can't speak to how sturdy they are. I've accidentally snapped these puppies across the room a couple of times and they're still going strong.
- If you don't know much about purse hardware and other accoutrements, take advantage of Annie's "Finishing Kits." She has one for most projects on her website, I think. The finishing kits don't include fabric--just hardware, webbing, mesh, sometimes interfacing, and so forth. Read the information to make sure you know what you're getting. It saves a lot of time (and grief if you accidentally buy the wrong size of something).
- Check out all the tutorial videos on her website. Very helpful stuff. (Or go to YouTube and search her name--then you can watch the videos full screen, which you can't on her website.)
- If you're a newbie to this kind of sewing like I am, take one of her Craftsy classes for the first time out. It really does help a lot.
What am I up to next? You guessed it...another Annie.
(Using Craftsy links in this post helps support my podcast and blog. Thanks so much!)