A finish--woo!

Okay, so this completion isn't such a big deal as it only took me about 90 minutes start to finish; and it only took that long because I wanted to fussy cut a motif and had to keep checking back on the instructions to make sure I had it facing the right direction. 

Also--normally I wait to do a reveal on a class project until I do a review of the class. But since it may be awhile since I have another finish, I couldn't wait to crow just a little bit. 

I finished something! Woo woo woo woo! 


image.jpg

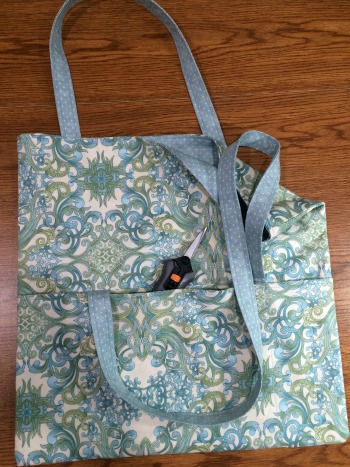
This is the Runaround Bag by Joan Hawley of Lazy Girl Designs, as appears in her Craftsy class Zip It Up: Easy Techniques for Zippered Bags.  (The pattern is available elsewhere as well; you don't have to take the class to make this bag.) She calls her zipper technique "ziptastic" and I have to say--it was stinking easy, at least in this design. 

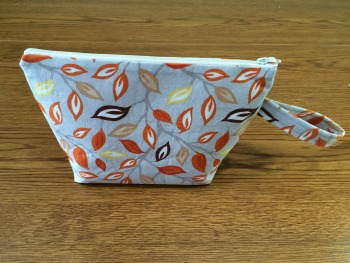
It gave me a nice way to use a couple of fat quarters from my stash--which was my main purpose for forcing myself to get more comfortable with purse-making in the first place.  

I misjudged the front fussy cutting just by a couple of inches; the print on the fabric was a little tricky in terms of isolating the motif easily. I had a sense I should adjust it a little bit but I wasn't totally convinced I knew where it was going to end up. Having done it once now, of course, I'd know better next time.

image.jpg

I did a lot better fussy cutting the back pocket.  

If I do this design again, I would probably put a little bit of velcro or something on that back pocket. It's a good place for a cell phone but I'd want it a little more secure if I used this regularly.  

image.jpg

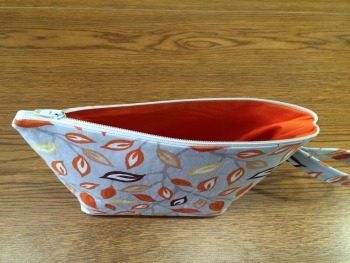
By the way, the lining is the same fabric as the top accent (see last photo). I used an invisible zipper because that's what happened to be sitting in my drawer that was the right color and size for this project. I've decided I don't like working with invisible zippers. It was okay to sew, though I had to do a lot more by feel than sight, but mostly it was very difficult to unzip after the sewing was done in order to pull everything through right-side out. For some reason, that zipper was very stubborn--I finally resorted to pulling everything through a half-open pocket. Once it was right-side out, the zipper worked fine again. 

You can't really tell from these photos but it has fusible fleece on the back to give it just a little bit of structure.  

I do like this bag; I used it immediately last night going out for dinner with my husband. It's nice to do a simple design that's actually functional. It's a good little bag for times when you don't want to carry a lot around. 

Of course, the first thing I thought as I was putting my stuff in my bag to go out to dinner was, "I think I need to find a wallet design now." My usual wallet is too big and heavy to work in this bag well. So if you've got any favorite simple wallet designs that make a smaller, lightweight, but functional finished product, lay it on me! (Tip: I don't want to have to fold my money in half to put it in the wallet, so I've already nixed several possible patterns.) 

There are two more bags in the class, so stay tuned... 

(BTW, there's a Craftsy link in this post that will help support this podcast and blog if you use it--so thanks in advance if you do!) 

Craftsy Class Review: Learn to Sew: Simple Bags with Nicole Vasbinder

Craftsy

So, if you've been listening to my podcast or following my blog for awhile, you'll know my intense dislike for fiddly bits and anything that even vaguely smacks of garment sewing. 

I love seeing other people's completed fabric purses, totebags, and duffle bags. But let's just say that my own brief forays into the field haven't been stellar. I made one totebag years ago that I still use frequently but I can still see the places where seams didn't match up and I didn't quite box the bottom correctly. Still, it's pretty functional and nice fabric so I live with it. I had another attempt at a purse that ended up in the trash. My biggest issue? I'm not a garment-sewer, and a lot of purse/tote/duffle patterns are written with the assumption you are.

Foldover tote completed

Foldover tote completed

While toodling through Craftsy classes a week or so ago to see what was new, I saw Learn to Sew: Simple Bags with Nicole Vasbinder. I thought, maybe that's the ticket. Maybe if I take a step back and put myself in garment-sewing school (just the basics, ma'am), I'd grow more comfortable and wouldn't find these kinds of projects as frustrating. 

I completed the class in one weekend. It wasn't too painful, and I completed both projects in a reasonable length of time and with only a few curse words here and there (all while working on the dang boxed bottom of that pouch when my machine decided to throw a hissy). Enough background. Here's the review:

Demonstrating the pockets on the front (1 pocked subdivided into 3 parts)

Demonstrating the pockets on the front (1 pocked subdivided into 3 parts)

This class would be great for someone who's never touched a machine before. It really does start out with how to sew, as per the name of the class, "Learn to Sew." The first lesson walks through parts of a sewing machine (in brief), how to thread machine and bobbin, and so forth. There are some neat graphics in the first lesson about how the sewing machine works. The second lesson is sewing seams--of course, this class is doing it "garment-style" so seams are generally wider than this quilter is used to. I was proud of myself that I only went to default-mode of 1/4" seams twice--for the most part, I remembered to do those gargantuan 1/2" seams she uses. 

The third lesson had a little information about fabric in general, as well as some suggestions for picking fabric for the totebag. From there, it goes directly into the projects with some "teachable moments" interspersed. 

Showing the interior pocket and lining

Showing the interior pocket and lining

True confessions: I watched most of the lessons on 2x speed, until I got to parts I felt I needed to watch more carefully. I did get frustrated a few times because the video doesn't always completely match the written instructions in the downloadable materials, and the instructions sometimes leave out key information about placement and so forth. I had to keep referencing the video over again to make sure I was doing things correctly. It's not a huge issue in this case, but I would have wished for more accuracy in having the written and verbal instructions match. I made notes on the written instructions just in case I ever go back to use them again and don't want to have to watch the whole lesson over.

Zipper pouch completed

Zipper pouch completed

My suggestion is, if you're new to sewing or new to this kind of sewing, watch each whole lesson first, and then back up and start doing the steps with her. In some things it's confusing until she gets to later steps and finally explains how she's got things laid out or why she's doing something the way she's doing it. 

I can't say this class has made me all gung-ho to run out and start churning out purses and bags. But I think it did increase my comfort level with the differences between garment-sewing and quilting to a degree. The totebag and zippered pouch are cute, but if I were to make either of them again there are several adjustments I'd make to them to have them work better for me. I'm just not committed enough to either design to poke at them like that. I already own a lot of patterns for totes and purses; I guess this is something I can just keep plugging away at when I get in the mood...once in a blue moon.

Interior

Interior

The Basics

  • 7 lessons, ranging from 11 minutes to nearly 30 minutes
  • The first two lessons are introductions to the basics of your sewing machine and sewing in general. Lesson 3 includes some more of that introductory information, but then goes into the cutting of pieces for the tote.
  • Lessons 4 and 5 are the foldover tote, and lessons 6 and 7 are the zippered clutch. 
  • The class materials give some troubleshooting information about sewing on your machine, and then supply lists, instructions, and templates for the two projects. As noted above, I was disappointed that there were some discrepancies between the materials and the video lessons. Just have the materials in front of you while you're watching the lessons so you can make notes to yourself as you go.

This is a tough one for me to rank because it's a topic that I come to having a bit of an attitude already. In the grand scheme of learning how to do garment/accessory sewing rather than quilting, I guess I can give Learn to Sew: Simple Bags with Nicole Vasbinder my usual thumbs up. But I'm still not an enthusiastic garment/accessory sewist. 

Don't forget, Craftsy is having a Valentine's weekend sale--lots of great classes to check out. I'm working on another one I just picked up this weekend that's just chock-full of great information and much more in my wheelhouse...but more on that one in a later post!

(Using Craftsy links in this post helps support my podcast and blog. Thanks so much!)


A Little Bit about Birthdays and Food

So yep, a birthday happened here. This week, I turned 49. Age doesn't bother me--I guess I figure I've earned every one of these years or something. Still n' all, it often surprises me to think, "Oh. I'm 49. How did that happen?"

I'd rather have reached 49 than the alternative. Thus, no hiding my age or being coy or cagey here. It is what it is, and I've had a great 49 years. Looking forward to the rest!

(For those of you reading this through feed readers or email, there's a photo gallery that appears here with controls for sliding photos back and forth. You may not see it in feeds and may need to check the website version.)

This year for my birthday, I did a cooking class at the New York Wine and Culinary Center and invited a few family members to join me. There were eight of us: me and my husband, my son and daughter, my nephew, my mother-in-law, and my brother-in-law and his girlfriend.  You work in pairs, so I paired with my daughter, my husband was with my mother-in-law, my son and nephew worked together, and my brother-in-law and his girlfriend were a pair. I went with eight as that's the number to fully surround one island in the classroom (four stations of two people each at every island). Everyone cooks their own dishes, but then you can share around the island--or even through the classroom--as you may choose. (The gallery shows my family and everyone's dishes--my son and nephew brought in a ringer and a chef-in-training did their plating for them. You can tell.)

I've taken several classes there before and have blogged about them in the past (here's one, and here's one, and here's one with a recipe I learned at a class, and here's another one). My favorite is the Farmer's Market class, so that's the one I chose for my birthday celebration. You start out by meeting at the Farmer's Market in the town where the institute is located, and the chef talks you through the process, lets you know what proteins and pantry items are available at the institute, and then gives you a portion of your registration fee back in cash and sets you loose on the vendors. You make up your meal plan as you go, making use of the chef as consultant as needed. My daughter and I were partners since she's a vegetarian and I was game to go meat-free, and we decided it would be fun to learn how to make pasta. I've looked into doing it in the past, but had never taken the dive. What better time, though, than when surrounded by chefs and culinary students?

DD and my ravioli

DD and my ravioli

And now I'm hooked.

I made the ravioli, and my daughter made the sauce. She riffed off a sauce she sometimes makes at home--also with no recipe. (My daughter has developed my love for free-wheeling cooking. Recipe? We don't need no stinkin' recipe.)

We filled the ravioli with a mixture of risotto, arugula (we wanted spinach but there wasn't any at the market--at this time of year? Really?), and garlic. The sauce has roasted red peppers--and she roasted those peppers too--tomato, onion, garlic, and fresh basil. Then we sprinkled some of the arugula over the top for pretties. Everyone loved it!

I fell in love. Just like making bread from scratch, there's something so wonderfully elemental about creating your own pasta from the egg up. I immediately started dreaming up all sorts of combinations of ravioli fillings and sauces.

The next day, on Sunday, I made homemade ravioli for a pasta salad for our family celebration (me and my father-in-law share a birthday). Without a pasta maker, I was rolling it out by hand with a rolling pin so it wasn't quite as thin, and I wasn't able to make as many ravioli. So, rather than pasta salad as a side dish, I served it as an appetizer. This time the ravioli was filled with ricotta, roasted red peppers bought from a store, fresh grated parmesan, and garlic; I tossed it with grape tomatoes, fresh basil, and more fresh grated parmesan. Even though the pasta was a little more chewy and thick because my rolling technique was a little rough, people still loved it. And I had a blast.

And so, my husband bought me a pasta maker for my birthday--and a drying rack, and a ravioli mold. The shipment should get here tomorrow. Mind you--this isn't self-serving for him. He doesn't actually like pasta, and he hates gooey cheese (so he's not big on cheese-filled anything). He'll eat it if I make it but it's nothing he'd look forward to. So buying me a pasta maker is truly an act of love on his part. And I'll be giving a lot away.

I also ordered the book Making Artisan Pasta by Aliza Green. It got good reviews; I should get that one later today.

And then, because it was on sale and I'm on fire, I bought a new Craftsy class: Homemade Italian Pasta with Guiliano Hazan.

So...be ready for more pics of pasta to come!


January Update on Craftsy Class Progress

If you're new to this blog, one of my 2014 Quilty Resolutions is to focus on completing a significant proportion of the Craftsy classes I've managed to amass over the last two years since I first discovered Craftsy. And that's not a fly-by-night resolution. I've got a lot of them. I have learned so much from the classes I've taken so far, and enjoy the opportunity it gives me to continue to expand my skills even when my work and travel schedule don't let me take classes at my LQS.

Mind you, I also want you to be supporting classes at your LQS! Look at your LQS listing first. Nothing can replace that in-person class experience with a teacher that can stand over your shoulder and actually see what you're doing, to offer suggestions for improvement. But if you can't make a class in person, Craftsy is (IMHO) the next best thing.

So, to hold myself accountable and focused on working my way through the classes, I'm posting a monthly update here of what I've accomplished. This is my first official update--here's what I've gotten done in January.

Wendy Butler Berns' Machine Quilting class--done! (See this blog post and this podcast episode for reviews.)

Peter Reinhart's Artisan Bread Making class--done! (See this blog post for the review and photos.)

Molly Stevens' Secrets of Slow Cooking: Mastering the Braise--done! (See this blog post for the review and photo.)

Stupendous Stitching with Carol Ann Waugh: I've made great progress! I imagine you'll be seeing a full report with finished project pretty soon.

Spindling from Fluff to Stuff with Drucilla Pettibone: I've made progress--I'll really have to make a judgment call soon as to when I'll decide I'm done with this one.

So...drum roll please. Here's the updated list. (For the original blog post with more detail on how I define "completed," and notes about individual classes, click here.)

Completed Classes (all topics)

Current count: 17 (+3 from last month--yippee!)

Classes in Progress

Current count: 3

(As I finish classes, I roll new ones into the line-up. So the above are the classes I'm working on as of this writing but will change as I continue to progress.)

Classes To Be Completed

Current count: 18 (-3 since last month)

Classes added this month*

Count: 2

  • Complete Knife Skills with Brendan McDermott. It was free, it's something I've been working on w/ YouTube videos and in-person classes at a local cooking school, and it plays into all the other cooking classes I'm taking. I also figured it wouldn't take me long to go through the class and pick up whatever techniques I'm missing.
  • Free-Motion Quilting with Feathers with Angela Walters. This was my choice for a free class as a thank-you gift for being a Craftsy affiliate. (Small print that I can't make small on my blog, sorry: Interested in being an affiliate yourself? Use this link to check it out. If you become an affiliate through this link, you help support this podcast and blog. End of small print and back to real life.)

*I'm not restricting myself by saying, "I can't get another class until I finish every one I already have!" Heck, if a class on my wishlist comes up for a 50% off sale, I'll quite possibly take advantage of that. And I know myself--as soon as I tell myself I can't do something, that's all I want to do. So I'm better off saying, "Sure, I can if I really want to. No big deal." Then it takes the pressure off and I'm likely to make a more reasonable decision in any given moment. That being said, consistently working on a couple of classes at once keeps me distracted and much less likely to be reading those sale emails. ;-)

(Transparency statement: Using any of the Craftsy links on this post help support this podcast and blog. But I'd be doing these posts regardless for my own accountability, and I wouldn't be talking about Craftsy if I didn't really like it!)